Friday, January 28, 2011

In which I go a little crazy with the knitting...


The Christmas Tree was just taken down a week ago...I've been a busy birdy with school but I've also been busy knitting.

I finally finished the long-suffered Rebecca knitted dress, the Rare Books cardigan and I've finally finished the Mittens of Loveliness (see below). I also managed to squeeze in a very quick cowl neck-warmer for myself and some leg-warmers and have started on a warmer hat for the Mr.

Proudly presenting the Not-Really-Rebecca Knitted Dress:


The finished product. Took just under 4 months to knit with a couple of wrong turns, deviations, heartache and banishment. But it turned out perfectly. I like it better than the original Rebecca magazine design which inspired it. I decided to go with short sleeves so I can choose whether to wear it with a long-sleeved top underneath like a tunic or as a sleeveless dress with a slip under. (Hanging Arm courtesy of the Mr).

Arm/Sleeve detail. I made a little band of ribbing around the opening. The dress is knit entirely in one piece without any seams. (I knit in the round from bottom hemline to neckline with bind off and picking up for sleeves (to make the sleeve holes). I did have to come back and do the ribbing around the sleeves and hem by picking up stitches, but otherwise its technically seamless :) ) This is because this airy mohair shows up all the seams through it and I wanted it to look really neat.

The neckline drapes really nicely around and can be worn as a cowl neck or as an off-the-shoulder number. I would have made it more like a hood, so it can warm your ears, but I ran out of wool :) The neckline was inspired by this dress I posted about ages ago. Its a really flattering neckline.


Now to the Rare Books Cardigan, the replacement for the unruly Twinkle cardigan. This cardigan was developed to withstand the freezing temperatures of the Rare Books room at the library. It also held up outdoors nicely the other day when it was -25 degrees celsius here, keeping me nice and warm under my outer jacket layer. The neckline doubles as a scarf, keeping the neck warm too. I haven't got a nice button for it yet, so I'm still fastening it with a safety pin. The body of the cardigan is knit seamlessly from hem to armpits, then splits into 2 fronts and back. I then knit the sleeves (several times cause I made them too small then too big!). The collar is a crochet rib because I wanted some more chunky texture. Plus I find its way easier to crochet a collar around a curve and calculate the reductions than it is to knit it.


Crocheted Neckline Detail

Worn Crossed-Over and Fastened

Overall Cardigan Unfastened

Magical Back 'Darts' for shaping


The Mittens of Loveliness are finally done and have been subjected to serious mitten-testing procedure and found very satisfactory. The Mr. says they are too big for me and claims that I knit them for him, but he will let me borrow them if I take care of them nicely. I am inclined to agree on the too-big part. But the pattern is one size, with no dimensions given, so it was really difficult to know if they would fit or not. I calculated my gauge and guessed they would be a little big, but I'm not clever enough yet to re-write a fair isle pattern myself. So I just wear the mittens a little loose in the hands. I'm planning on stuffing my old mittens inside these ones for extra warmth, so there is at least plenty of space for the extra layer. I estimate that the Mittens of Loveliness are good down to -5 outside a pocket, and good down to -15 inside a pocket. With the extra old mitten inside they should be good down to -25 inside a pocket and to -15 outside. We shall see. The weather here is yet unpredictable (even to the weatherman it seems). Today we have snow where none was forecast.


Behold!

Just as nice on the other side

Happy Together at Last


The neck-warmer was developed from a vogue knitting email I got last week with their 'sand cables' stitch. I had seen a few months ago someone design a cowl with a similar type of cable stitch inspired by a Burberry scarf. I thought theirs was rather nice and when I saw this stitch pattern in my inbox, I thought it would look great as a cowl too. Having about half or 3/4 a ball of wool left from the Rare Books Cardigan, I got knitting. I had made excellent progress (ie: at least 30cm) when I realised that I'd messed up somewhere with my over/under cable business. Being the perfectionist I am, I ripped it all out and started again. But on 10mm knitting needles, I was still done by lunchtime. I took it for a test run yesterday and found it satisfactory, though not as warm as a triple wrapped scarf. It was nice though not to worry about catching scarf ends in the zipper of my jacket for once. Worn about the forehead this also makes an excellent (and hilarious) turban-style headband. I don't recommend this unless you want laughs. If you want to make your own its easy:

Let's call this: Snow Drift Cowl (there's no sand around here, but plenty of interesting wind-driven snow patterns)
Get some 10mm knitting needles and some chunky chunky wool. I used Bernat's Roving in 'Bark' and less than one ball. Probably could get 2 cowls out of one ball...
Cast on 24 stitches (thats 2 repeats of the 12 stitch wide sand cables stitch pattern). You can do 3 if you want it to be a wider cowl. It will curl up at the edges, but the cable kinda holds it flat a little, so you wont have the whole cowl roll up into a tube.
Following the stitch pattern, knit merrily being very careful not to mix up when you are cabling in front or behind.
Make about 7 repeats of the pattern (about 70 rows). You can keep knitting if you want a longer cowl or want to twist it or loop it twice when you wear it.
Finish with two plain old rows of stocking stitch and bind off. (72 rows + cast on and bind off)
Mattress stitch the ends together to form a loop.
Weave in your ends and you are done.

Looks sort-of like a braid when worn

Laid flat

How the 'sand cables' look


Right, so Leg-warmers. These I also used Bernat's Roving in 'Clover'. I think calling it 'clover' was a stretch, its more like dirty acid green (but I guess that doesn't sound so appealing!). Anyway, these were another self-invented pattern. I used 2 balls of wool, one for each leg. There's no shaping, they just stretch to fit your legs. These make thigh-high leg-warmers (its cold here) but you will look slightly silly. But hey, everyone looks silly in leg-warmers. Measuring your own legs is essential here, or you will have arm-warmers, not leg-warmers. Its also important not to cast on or bind off too tightly, or you will have tourniquets, not leg-warmers.

Folded in Half

Stitch Detail

The full length is 36 inches

No More Cold Knees:
You will need 10mm knitting needles, 2 balls of chunky chunky wool such as Bernat's Roving and a measuring tape.

Measure your mid-calf and mid thigh. Pick a mid-measurement between the two. I've got shapeless legs, so I made the leg-warmers straight. You can test your chosen measurement by making your tape measure into a loop around you leg and seeing if you can get the loop up to the level you want your leg warmers to end. You will look pretty silly doing this, so I recommend doing thus only amongst good friends. Adjust your measurement accordingly. Remember that the ribbing at the top and the bottom of the leg-warmers makes them stretchy at least an inch or three.

I've you have shapely legs, you might want to add some shaping at the thigh-end. I would make some little increases 1 stitch in from the end of a row on the right side of the stockinette. Near the seams, a M1 is hidden quite well and its easy to make. The chunky wool makes about 2.5 stitches to 1 inch, so if you have several inches different between calf and thigh (more than 3 inches different), you will need make some increases. Eg: for an extra 2 inches, you need to increase 5 stitches on right-side rows. So it will take you 10 rows to make your 2 inch increase.

Right. So my calves are 13 inches and thighs 16 inches (don't judge!). I made my leg-warmers 13 inches (flat measurement un-stretched, they easily make 16in stretched), so at the calf, they are comfy (and I can stretch them over my winter boots if I want) and at the thigh they are stretched and stay up nicely. At our gauge of 2.5 stitches to the inch, that equates to about 32.5 stitches. Allowing for my relaxed (lazy) knitting tension and love of whole numbers, I rounded this to 30 stitches.

So I cast on 30 stitches and then made 10 rows of K1, P1 ribbing.
I followed this with 50 mesmerizing rows of stocking stitch.
Then finished off with another 10 rows of K1, P1 ribbing.
Bind off loosely. This is important for avoiding tourniquet.

So, really, the measuring and calculating is the most difficult part, the knitting is easy. I made mine while reading this.


The Mr. requested a warmer hat. For this I'm using the lovely thick Peruvian wool from Cascade which I got at my favourite shop in Montreal. Again, an invented pattern. This one is still in testing though, so we shall see how it turns out! The wool feels good and should be nice and warm. I'm knitting tightly, hoping it wont be too stiff a fabric but will be warm. We don't want the Mr. to have a silly hat.

I love the colour of this wool, its the perfect blue for me and looks great on the Mr too!

Sunday, December 26, 2010

Merry Christmas!


Wishing you all a very Merry Christmas and Happy New Year!

I made my own Christmas Tree this year out of sticky note flags. Total cost $0.50. 100% recyclable & reusable. Couldn't want better than that!

Snowflake photography is my new hobby for winter. And, yes, my observation so far is that they are all different. They really do look like they do in cartoons though!

Sunday, December 12, 2010

A Snowy Sort of Christmas Scarf


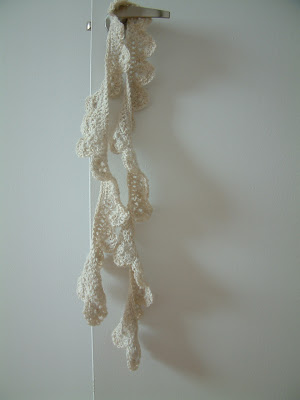
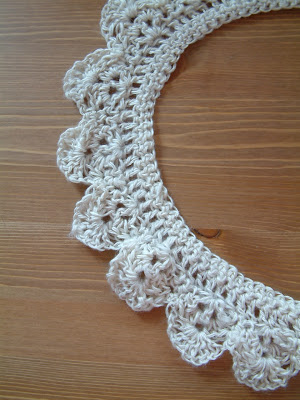
Its almost Christmas so I thought I'd share some nice gift* with my one or two readers. This is a simple scalloped scarf that falls nicely when draped or when wound around makes a nice lacy collar. You can even wrap it around your head and pretend to be a lion if you like. It works well for that too. I made mine out of a handspun 2ply alpaca which was somewhere between a light to medium weight wool (sport-worsted range) and I used a 4.5mm crochet hook so the scarf is nice and flexible for wrapping around. You will need about one ball somewhere between 40-50g. If you run out you can stop after 4 rows and just have a less scallopy scallop. It will still look nice after 4 rows.

*Most definitely for personal use or for gifting to friends & family. Not for evil profit making purposes, commercial use of any kind or in way. Pattern is not for sale, hire or exploitation. Be good, its Christmas... But if you make it send me a picture cause I'd love to see yours :) Also if my instructions make no sense or you can't figure them out, please let me know!

Hangs nicely for casually throwing about your neck...

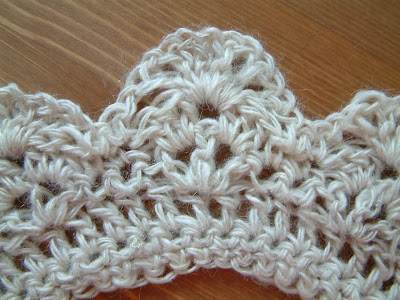
A closeup of the scallop repeat.

The scarf curves around into a circle as the stitches are 'overloaded' on the scallop side. This gives it it's nice fall.

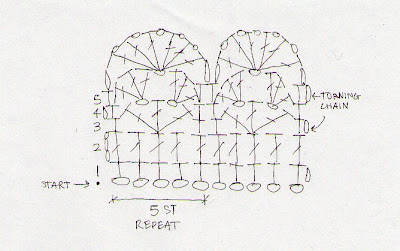
The pattern.

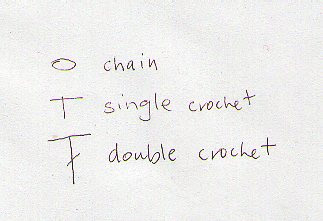
Key to the pattern.


The pattern is a five stitch repeat.
(SC= Single Crochet, DC= Double Crochet, CH= Chain)

You start with a chain that is a multiple of 5 + 1 (the +1 is the turning chain). My scarf has 30 scallops so that's 30x5 + 1 =151 chains. If you want it longer or shorter just test out the length while you are chaining along. So go ahead and make chain merrily.

1) The first row is all single crochet. So skip the first chain from the hook and make a single crochet into the second and every chain along until you have 150 single crochet stitches. Then at the end of the row chain three for the turning chain and turn.

2) The second row is all double crochet. So skip the three chains and make double crochet stitches into every single crochet along including the first one until you have 150 double crochet stitches. At the end of the row chain one and turn.

3) The third row starts with one single crochet into the first double crochet of the row below. Then skip one stitch of the row below and (double crochet, chain 1, double crochet, chain one, double crochet into the same DC of the row below) then skip one DC of the row below and make single crochets in the next two stitches. Then repeat the (DC ch 1 DC ch1 DC) + SC until you get to the end of the row. You should have 30 little scallops. At the end of the row ch 1 and turn.

4) The fourth row begins with a single crochet into the first single crochet of the row below. Then three double crochets into the gap made by the ch1 of the row below. After you have made the 3DC then chain 1 and make another 3 DC into the next ch1 space of the row below. Then make a single crochet in the SC of the row below. Then repeat the SC, (3DC, ch1, 3DC), SC until you get to the end of the row. SC in the last SC and then chain one to turn.

5) The fifth row begins with a single crochet into the first SC of the row below. Then ch1 and make DC ch1 DC ch1 DC ch1 DC ch1 DC ch1 DC ch1 into the ch1 gap of the row below. Then make one single crochet into the SC of the row below. Repeat SC (DC, ch1 x 6) SC until you get to the end of the row. Make your last SC and then cut your thread leaving a 10cm long tail to weave in. Weave in the other end and you are done!

Twirl around the room and do a dance!

Monday, November 22, 2010

What does that Birdy do?

This Birdy has been a busy little one with lots of reading, writing and studying in general. I have been fitting in some making though, a stitch here and there and have made progress on several projects.

First is the striped grey & brown alpaca neck-warmer I made for the Mr. Its really soft and warm, ideal for these days as they creep steadily towards the minuses. We've not had much snow yet, but it is getting very snowy about the ears (as Pooh would say). The Mr. has been coping so far with some of the other hat and scarf I have made him, but the change of weather is expected soon and he will no doubt be wearing this often. It doesn't photograph well as the wool has a soft halo that the camera finds hard to focus on. I experimented with jog-less stripe techniques for knitting in the round here and it worked a bit but its still not perfect enough for my liking (though it is pretty nice!):


The next is something I'm still working on, the Its Cold Outside Cardigan. This is a replacement for the unruly Twinkle cardigan that refused to fit in my suitcase. I'm making up my own pattern here as I go along, inspired by various ones I've seen in knitting magazines and in wandering around window shopping. It's hopefully going to have a soft folded ribbed collar and some pockets (must have pockets!). Progressing so far up to the lower middle back where I'm putting in a couple of darts (knitted decreases) to give it a little shape around the waist. The wool is a wool/acrylic blend from Bernat but has a nice colour depth with light grey flecks through the brown (makes it look more 'expensive'!):


Ahh, the beautiful mitten of loveliness. From this pattern in Debbie Bliss that I wrote about earlier. Strangely, no dramas here. And for my first attempt at knitting with more than two colours and in an intricate design, I must say I am pretty pleased with myself. I have taken to wearing my single mitten around the house to admire it. It will soon be joined with its friend, the other hand mitten and they will dance happily together. Though given the way the temperatures are going, I'll be wearing another pair of gloves underneath. But still, aren't the colours lovely:

The Rebecca Knitted Dress. This is banished to solitary confinement in a plastic bag in the closet for not behaving itself. I have to rip out the last 3-4 inches because my decreasing stitches are not nice enough. I tried to fix them but it just turned out worse. So until I am in the mood for extensive mohair-wrangling ripping out, it shall stay in the closet. The good thing about the knitting is that I have discovered that the gauge and wool make an excellently light and beautifully draping fabric:


And I have been getting a lot of wear out of this scarf, the enormous yellow one as I can bury my face and ears in it. This is particularly important in the Rare Books room of the library which has temperatures ideal for maintaining Renaissance books, but not for maintaining living people!

And I'm currently in knitting love with this beautiful cape: http://www.knittingtodaymag.com/pattern-previews/woods-girls-cape
Yes, its a children's cape, but its so nice, I don't see why 10 year olds should have all the fun. Luckily I'm pretty little and can fit into child's sizes so I'm considering making this one. The dilemma though is whether I'll indeed look like a child in it or just silly or it will look cool. What do you think? Make or not?

Thursday, October 14, 2010

Kermit & Grover go for a Walk

I recently went for an introductory weaving class here and got to try a small rigid heddle loom (a cricket loom by schacht). It was fun and I managed to weave a scarf for the Mr. in less than 3 hours. The class was taught by Collete of Interstitial Spaces who has a weaving workshop. Having had the class I have been dreaming about weaving ever since. Now I'm planning on getting my own loom but maybe a bit bigger than the Cricket as its only 10 inches of weaving space wide. I like the look of Ashfords slightly bigger loom but I'd like to test drive it first... Here's some pictures of the Mr. modelling his scarf which I have dubbed 'Kermit and Grover go for a walk" due to the colours...


Its a little too short for the Mr. (I used all the wool wound on the loom!) but worn like this with a jacket kinda like a cravat should look okay.


Before washing the weave was slightly more open. Washing pulled it together slightly as well as softened it up nicely.

I wove sections of 4 rows green & 4 rows blue for about 10cm then swapped to 3 rows of each so you get a subtle variation in pattern. Most of the pattern is from the way the loom was warped though (the vertical threads) which Colette set up for us. Its fun how just alternating two different colours can create so many patterns.


I think weaving may be addictive.

Sunday, October 10, 2010

Neck Things

I was getting jumpy from lack of making so I made some more necklaces...

New Toast Catalogue is nice to gaze at. May have inadvertently influenced the colours of my necklaces...

Wooden it be Nice? Square wooden beads & copper beads on brown waxed polyester thread (the inter-situ copper beads help it to sit flat when worn)

The Orientalist. Vaguely orientally inspired in the Victorian sense (as in the Victorian era mania for all things oriental resulting in a profusion of 'oriental' goods that were neither from Asia or replicated things from Asia, but were well sought after decorative items in middle class Victorian homes none the less). Black glass matt finish oval beads, bronze beads, red painted wooden carved bird bead. black waxed polyester thread. The whole reason for this necklace is because I found the bird - it was love at first sight - and I had to have it.

Glazed and Confused. Green & blue glazed ceramic beads, small copper beads and brown waxed polyester thread. Likewise, fell for the colour of the beads and the interesting features of the glazes, each bead is interesting in itself.

A paler shade of pale. Grey waxed polyester thread and grey painted seeds. It was grey. What can I say. I love grey.

Friday, October 1, 2010

Living in the Silence Between Movements of a Symphony

I read the new Toast travel article today about the Arctic & Antarctic travels of Sara Wheeler. I was struck by the poetry of that line:

"Life was absent from our landscape; it was like living in the silence between movements of a symphony."

Sometimes things just reach into you and dig deep resonating with somewhere deep inside. I like this line because it does seem to me that the essence of our lives are not found in moving from one activity to another but in the stillness in between. Not of doing but of being (we are human beings after all, not human doings). In these moments where everything comes into this strange clarity and makes sense just for a moment, very briefly. The sunlight falling across autumn leaves, the clearing in the clouds, the smile of a friend.

Quietness, stillness, silence.